Kubernetes Fundamentals: Understanding Pods, Deployments, Services, and Manifests

📍Introduction
🚀Welcome to my Kubernetes blog series, where I share my Kubernetes learnings and try to deep dive into topics. In this blog, we will explore K8s concepts such as K8s pods, Manifest files, Deployment, and Service in detail with some hands-on and by the end of this blog hopefully you will be able to create a K8s manifest file.💪
Prerequisites: You should be familiar with the K8s cluster if you want to brush up you can refer to my blog:
Kubernetes Fundamentals: Features, Necessity, and Architectural Insights
📍Pods vs. Containers
| Pod | Containers |
| A pod is the smallest deployable unit in K8s that contains typically one or more containers running inside. | Docker is one of the tools that is used to run an application in a container. |
| A pod can be scheduled, automatically scaled, and automatically healed. | Containers cannot be scheduled. |
| If a pod goes down or is unavailable it can replicate to maintain the desired number of pods. | If a container crashes we have to manually run the container using the docker run command. |
| All the components of the K8s cluster work to provide these features and run this smallest unit called pod running a containerized app. | We cannot automatically scale the containers to distribute the load using Docker, it can be done using Docker Swarm. |
| It can be used in production. | It cannot be used in production. |
All the features that a container cannot do alone can be done when the container is run inside a pod with the help of K8s architecture/cluster. So that it can be used in production.
Let's create a Pod.
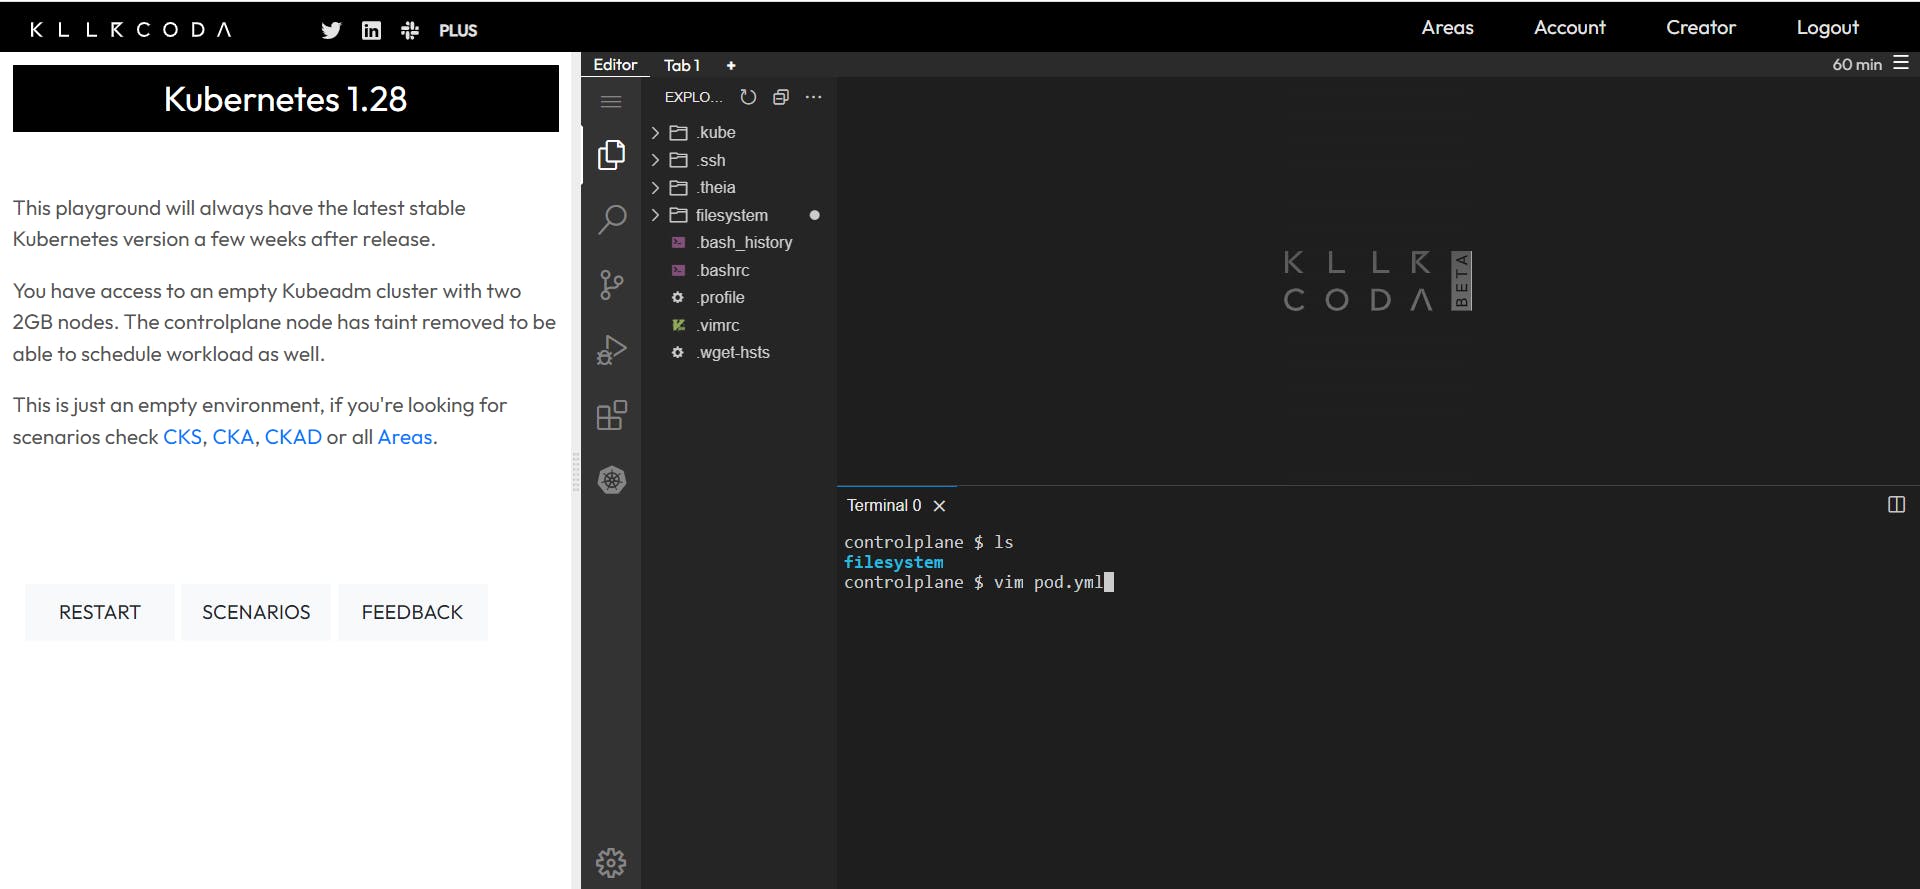
👩💻I will be using a K8s playground where you can practice Kubernetes for free https://killercoda.com/playgrounds. The playground will look something like this:
📍Manifest File
In K8s to create anything (e.g.: Pod, deployment, service, expose an app, etc.) a 'Configuration file' written in 'YAML' called 'Manifest File' has to be created.
You can refer to my Docker-compose blog in the YAML section for a quick overview of how to write a YAML file:
Exploring Docker Compose: Building a 2-Tier Flask To-Do Web App
Adding to writing a YAML file:
# If you want to create a list/array of objects for eg:
students_dict = {
    "students": [
        {"name": "Alice", "age": 20, "hobbies": ["reading", "painting"]},
        {"name": "Bob", "age": 22, "hobbies": ["swimming", "cooking"]},
        {"name": "Charlie", "age": 21, "hobbies": ["gardening", "photography"]}
    ]
}
# Here, we have a list of dictionary object
Its equivalent YAML file will be written as:
students:
  - name: Alice
    age: 20
    hobbies:
      - reading
      - painting
  - name: Bob
    age: 22
    hobbies:
      - swimming
      - cooking
  - name: Charlie
    age: 21
    hobbies:
      - gardening
      - photography
A manifest file is used to define and configure Kubernetes resources that include pod, deployment, service, etc.
📝Note: Since the YAML file does not contain {} brackets or " " It uses indentation (spaces) to identify the structure. Therefore, make sure you give proper indentation otherwise the K8s cluster cannot recognize the configuration file due to syntax error.
📍Structure of a Manifest File
apiVersion: <group/api_version>
kind: <resource_kind>
metadata:
    name: <resource_name>
    labels:
        key1: value1
        key2: value2
spec:
    <spec_field>
apiVersion: Here we specify the API version in the formatgroup/api_version. Here thegrouprepresents the API group and theversionspecifies the version of the API.kind: Here we can specify the type of resource that we are defining E.g.: Pod, deployment, service, Jobs, Cronjob, Ingress, ConfigMaps, etc.metadata: Includes metadata about the resource that can be used to identify. This metadata field is not a list, it is a single object with attributes like name, labels, namespace, etc.spec: This section defines the desired state of the resource. The specific fields in thespecsection vary based on the resource type. For example:For a
Pod, you'll define containers, volumes, and other attributes.For a
Deployment, you'll define replicas, containers, and strategies for updates.For a
Service, you'll define ports, selectors, and other networking-related details.
Different resource types have their own set of attributes within the spec section, tailored to their functionality.
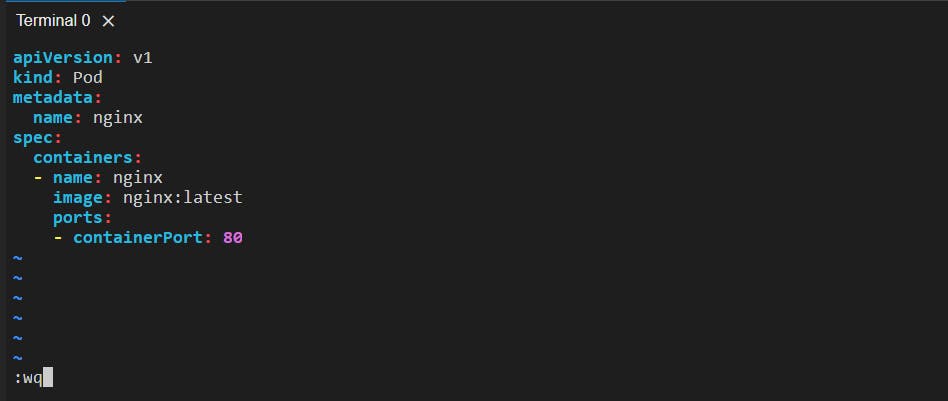
📍Manifest File for a Pod
The following configuration file is an example of defining a Pod consisting of a container running the NGINX image using a Manifest file. You can give whatever name you want to this file example: nginx-pod.yml
Try to write the manifest file by yourself instead of copying it directly.
apiVersion: v1
kind: Pod
metadata:
  name: nginx
spec:
  containers:
  - name: nginx
    image: nginx:latest
    ports:
    - containerPort: 80
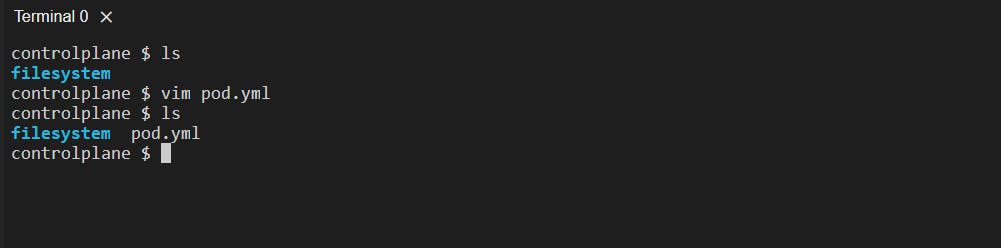
Creating pod.yml file:

Save and quit:
Pod Manifest file created:
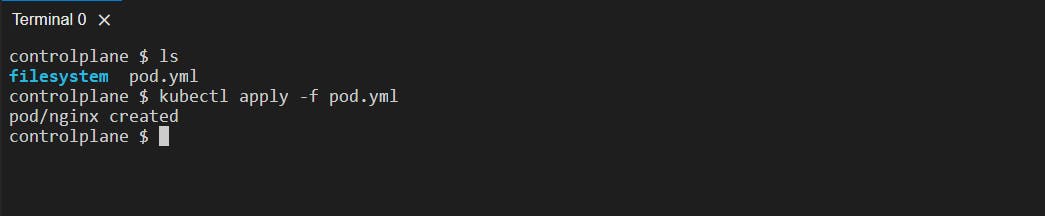
Now, we have to give this configuration file to the K8s Cluster using kubectl.
kubectl apply -f <file_name>: This command is used to create or update Kubernetes resources based on a configuration defined in a Manifest file. The flag-frepresentsfile.Here, the resource is a Pod.
After executing this command we can see that our NGINX pod has been created:
kubectl delete -f <manifest_file>: Deletes the Kubernetes resources defined in the specified manifest file.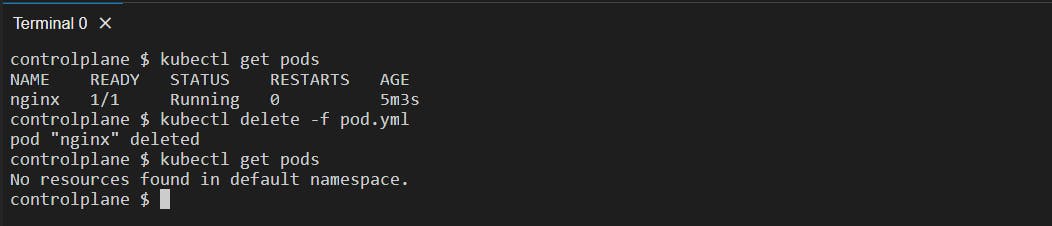
To see the list of pods in our system:
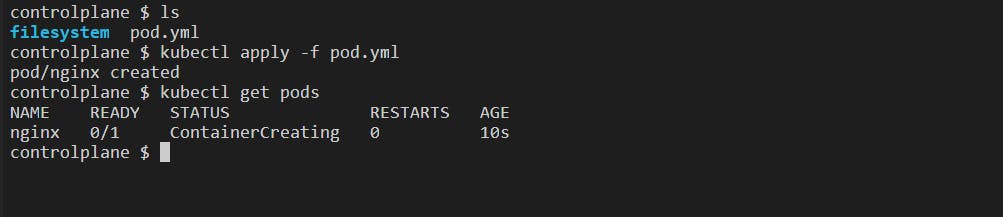
kubectl get pods: It will get the pods existing inside the "default namespace".Here the pod is being created. Internally it pulls the image from the Docker Hub repository and runs it:
Now, we can see that the pod is running:

kubectl get pods -o wide: It will give detailed information about the pod along with the IP assigned to the pod by the cluster.
You can access this running nginx pod at this given Pod IP at port 80 with the curl command:
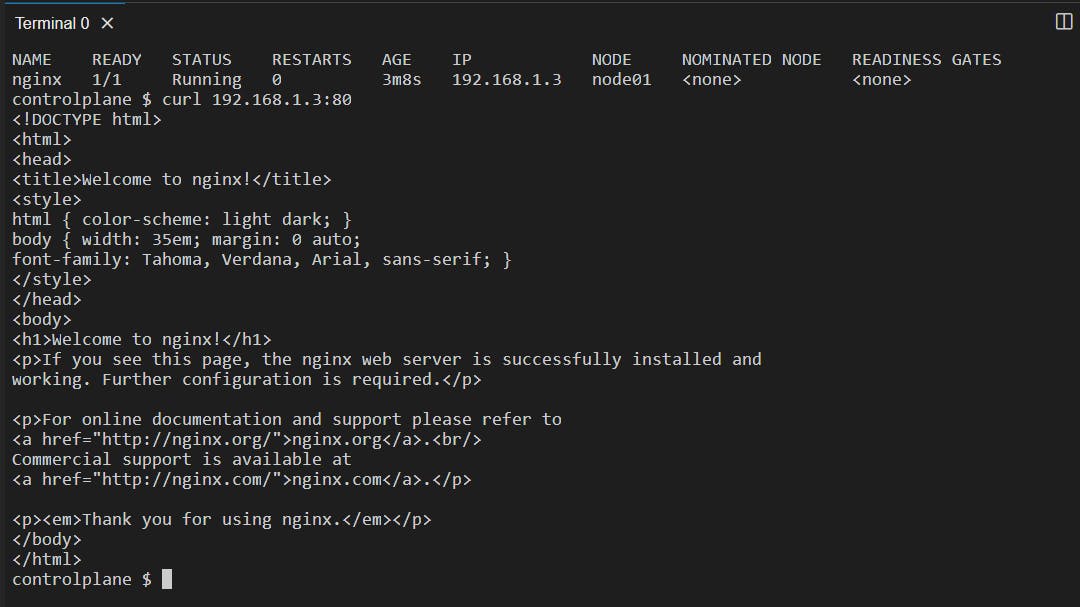
Here, an NGINX pod has been created in the 'default namespace' from the Manifest file.
What is this 'default namespace'? Let's understand what is a namespace and why it is needed.
🎇The internal process of the kubectl apply -f <filename> command
kubectl will give this Manifest file to the API Server.
API Server parses the YAML file, sees the
kind: Pod, and sends this to the Scduleher.Scheduler will create a Pod and give this information to the API Server.
This information i.e. the state of the resource (pod) will be stored in etcd component.
After this information is stored and acknowledged by the API Server the pod needs to be sent to the node which is sent by the Controller Manager.
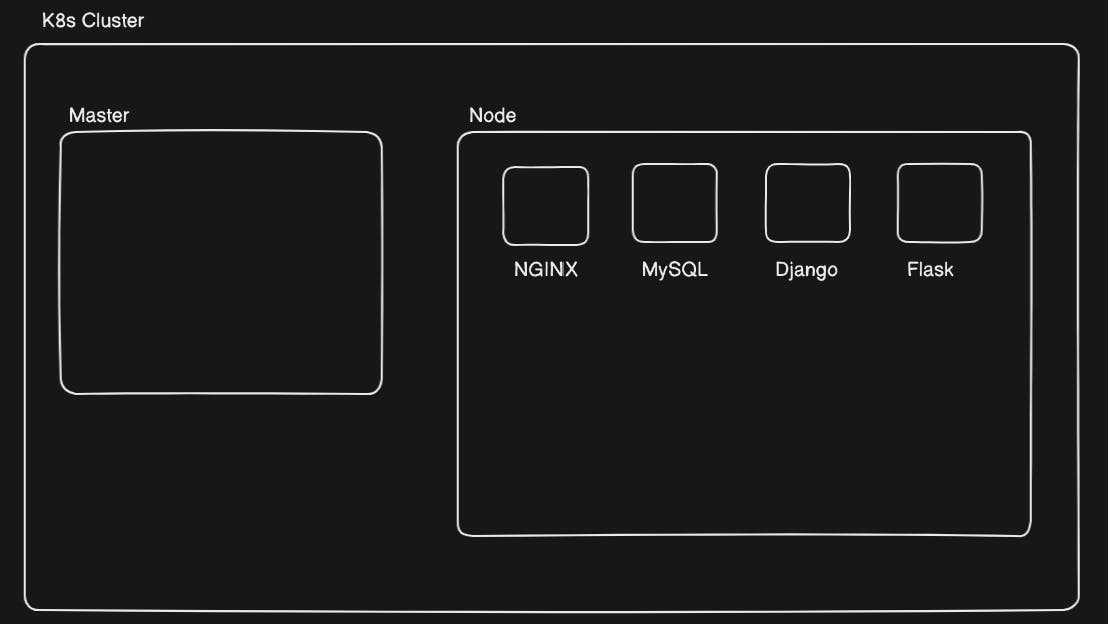
📍Namespaces
Imagine a K8s Cluster where the Node contains an NGINX pod, MySQL pod, Django pod, and a Flask pod. Each pod is running a container of their respective names.
We know that we can create replica sets of a pod to balance the traffic. So I created a replica set of 3 NGINX pods and a replica set of 2 Flask pods.
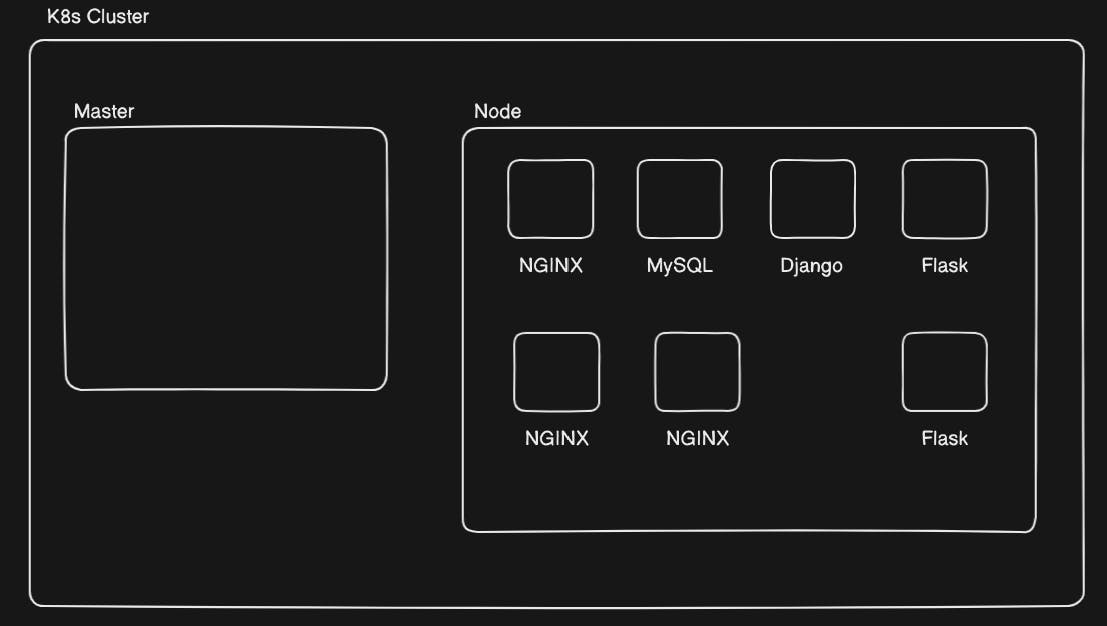
You can see that now all the pods are mixed, this will make it difficult to manage the pods inside this worker node. Therefore, we grouped the replicated pods so that they could be easily manageable.
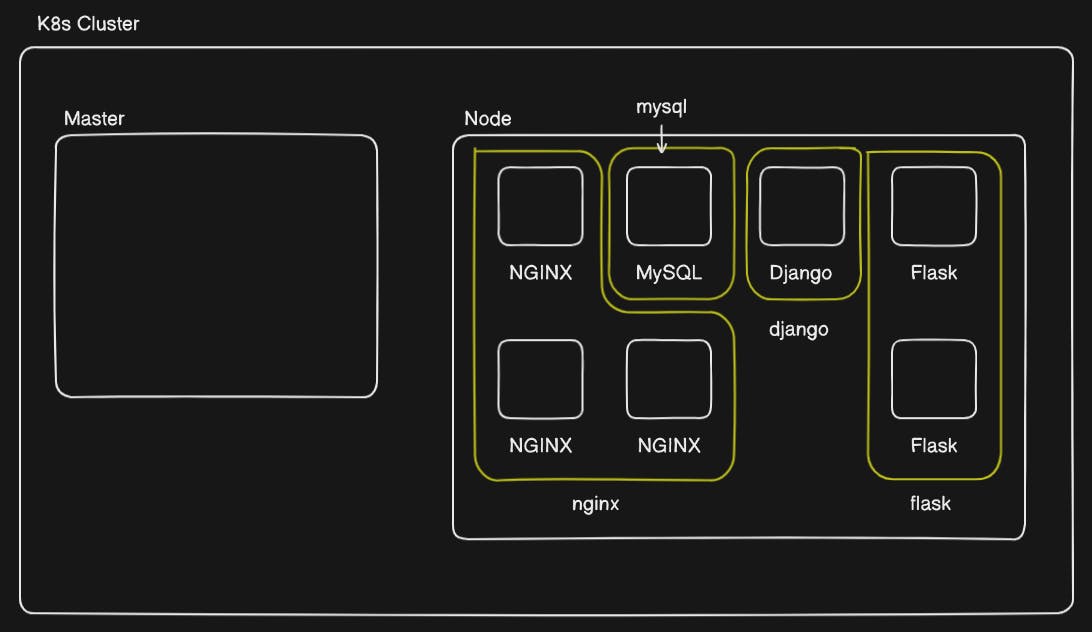
This grouping is the fundamental concept of "namespaces".
✔Definition
Namespace is an abstraction or a logical entity that allows you to isolate your resources such as pods, deployment, volumes, services, replica sets and all the things needed for an application to run on a K8s within a cluster ensuring that resources in one namespace do not interfere with or have access to resources in other namespaces.
This isolation helps organize and separate different projects, teams, or applications. This isolation extends to the resources used by the pods as well i.e. pods in different namespaces do not share resources. Some of these resources include:
Networking Isolation: Pods in different namespaces have their own unique IP address space and cannot communicate with each other directly using IP addresses.
Resource Isolation: Kubernetes enforces resource quotas and limits on a per-namespace basis. Each namespace has its own set of resource quotas, and the resources used by pods in one namespace do not affect the resource availability for pods in another namespace.
Name Isolation: Resource names (such as pod names, service names, etc.) must be unique within a namespace. However, resources in different namespaces can have the same names without conflict.
Labels and Selectors: Labels are namespace-specific, so a label applied to a resource in one namespace won't affect the same label in another namespace. This allows for fine-grained control over the selection of resources.
Namespace Scope: Many Kubernetes resources are scoped to a namespace. For example, services, replication controllers, deployments, and other higher-level abstractions are often created within a specific namespace.
🎇Namespace kubectl commands
kubectl create namespace <name>: It will create a namespace with the specified<name>.
kubectl get namespace: This will give a list of all the namespaces in the cluster. By default, there are some namespaces created in our system to manage the K8s cluster.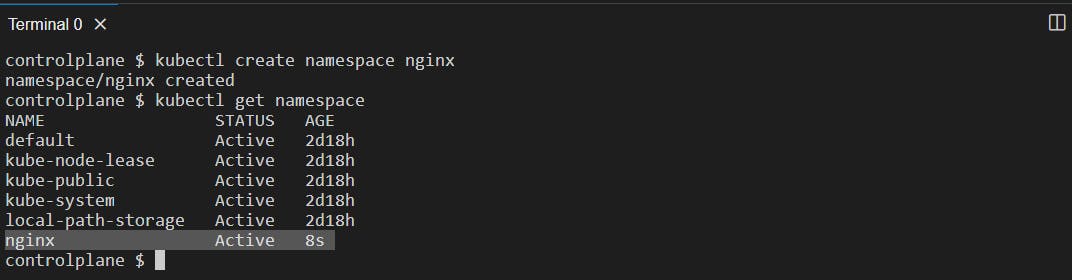
Now, let's put our NGINX pod into this newly created NGINX namespace. To do this we have to modify the Manifest file. We know that, in the K8s Manifest file metadata is an object that contains the attribute namespace therefore, we will add it.
apiVersion: v1
kind: Pod
metadata:
  name: nginx
  namespace: nginx
spec:
  containers:
  - name: nginx
    image: nginx:latest
    ports:
    - containerPort: 80
Modifying the file:

Now, we need to apply these changes made to the file using the kubectl apply -f <filename> command.

If your pod was running before modifying the manifest file then it will show the prompt pod/nginx modified.
Now to see if the pod has been created or not:
if you do kubectl get pods it will give this prompt:

kubectl get pods -n <namespace>: Gives a list of pods existing in the specified <namespace>. The -n represents a namespace.

📍Deployment
We discussed that the pods can be replicated i.e. we can make replica sets of the pod like we did for NGINX and Flask pod in the previous section. To make a copy of the pod it will be tedious to manually make a manifest file for the copy of the pod. I cannot achieve auto-scaling if I have to manually create a pod. For this, Kubernetes offers a built-in resource "Deployment".
Deployment is a higher-level abstraction to manage the deployment and scaling of pods. Simply Deployment is a configuration for a pod. A "Deployment Manifest file" has to be created where we define the desired state of our pod. In this desired state we can specify the number of replicas of a pod running at all times inside the 'replicas' field, and they provide mechanisms for rolling updates and rollbacks.
Deployment helps us achieve the Desired state, Auto Scaling, Rolling updates, Rollbacks, and Self-Healing.
✔General Deployment Manifest file Structure
apiVersion: apps/v1
kind: Deployment
metadata:
  name: example-deployment
spec:
  replicas: 3
  selector:
    matchLabels:
      app: example-app
  template:
    metadata:
      labels:
        app: example-app
    spec:
      containers:
        - name: example-container
          image: nginx:latest
          ports:
            - containerPort: 80
apiVersion: Here, we wroteapps/v1where 'apps' is the API group andv1is the API Version.spec: Specifies the desired state of the Deployment:replicas: The desired number of replicas (pods) that should be running. In this example, we have3 replicas.selector: Defines how the Deployment identifies the pods it's managing. It uses label selectors.matchLabels: Specifies the labels that the Deployment uses to select the pods it should manage.
template: Describes the pods that the Deployment creates and manages:metadata: Contains metadata about the pod template:labels: Labels that are applied to the pods created by this Deployment.
spec: Defines the specification of the pod template. ( Same as what we had defined in the Pod Manifest file ).
❓Why do we write apiVersion v1 in the Pods and apps/v1 in the Deployment Manifest file❓
Ans:
Pods (
apiVersion: v1):The
v1API version is the core Kubernetes API version and represents the initial version of Kubernetes objects.We could also write it as
core/v1since the core API group includes the initial version of Kubernetes objects.
Deployment (
apiVersion: apps/v1):- Deployments, ReplicaSets, and other higher-level resources for managing application deployment were grouped under the
appsAPI group to maintain a separation from thecoreresources.
- Deployments, ReplicaSets, and other higher-level resources for managing application deployment were grouped under the
As there were updates in K8s more and more API objects were introduced that provided effective management of resources. Here is a list of some common API groups that will be useful while defining a Manifest file for various resources:
core/v1: This is the core API group, and it includes fundamental resources like Pods, Services, ReplicationControllers, and more.
apps/v1: This API group includes higher-level resources for managing application deployments, such as Deployments, ReplicaSets, and StatefulSets.
batch/v1: This API group includes resources related to batch processing, such as CronJobs and Jobs.
networking.k8s.io/v1: This API group includes resources for networking features, such as NetworkPolicies and Ingresses.
storage.k8s.io/v1: This API group includes resources for storage-related features, including StorageClasses and PersistentVolumeClaims.
rbac.authorization.k8s.io/v1: This API group includes resources for Role-Based Access Control (RBAC), such as Roles, RoleBindings, and ClusterRoles.
autoscaling/v1: This API group includes resources for HorizontalPodAutoscalers.
custom: Custom Resource Definitions (CRDs) allow you to define your resources and API groups, extending Kubernetes with your types of objects.
With different API groups, it provides a clear distinction between core resources and higher-level abstractions. This approach helps maintain compatibility, allows for clear versioning, and facilitates the introduction of new features without disrupting existing core functionalities.
❓Why do we use labels instead of namespace in the Deployment Manifest file❓
Ans:
While both can be used to classify and manage resources, they have distinct use cases:
Labels:
Labels are key-value pairs attached to resources that provide additional metadata and context. They are used to categorize, select, and organize resources based on their attributes. Labels are versatile and can be applied across namespaces, allowing you to group and query resources across different namespaces.
In the context of a Deployment manifest file, labels are typically used to:
Identify different components or services within an application.
Specify attributes like application version, environment, role, or owner.
Select subsets of resources for operations, such as updates or scaling.
Namespaces:
Namespaces are logical partitions within a Kubernetes cluster that provide isolation and resource management. Namespaces also provide resource quotas and limits to control resource usage within a namespace.
In the context of a Deployment manifest file, namespaces are used to:
Isolate different environments (e.g., development, staging, production).
Separate different teams or projects within a single cluster.
Provide resource quota enforcement and access controls.
Using both labels and namespaces together is a powerful way to organize resources. You might use labels to differentiate components or versions of an application across namespaces. For example, if you have multiple environments (dev, prod) within each namespace, labels can help distinguish between different components within the same environment.
🎇Here is a list of some attributes that can be used as label keys:
app: Identifies the application to which the resource belongs.
environment: Specifies the environment in which the resource is deployed (e.g., "development," "staging," "production").
version: Denotes the version of the application or component.
release: Indicates a specific release or deployment of the application.
tier: Describes the role or tier of the resource (e.g., "frontend," "backend").
component: Identifies a specific component or module of the application.
owner: Specifies the owner or team responsible for the resource.
created-by: Indicates the tool or system that created the resource.
managed-by: Shows the management tool or process responsible for the resource.
service: Used to indicate the type of service provided by the resource (e.g., "web," "database," "cache").
A quintessential manifest file that highlights the effective use of labels for a 3-tier application. (Reference - ChatGPT)
# Frontend Deployment
apiVersion: apps/v1
kind: Deployment
metadata:
  name: frontend-deployment
spec:
  replicas: 3
  selector:
    matchLabels:
      tier: frontend
  template:
    metadata:
      labels:
        tier: frontend
    spec:
      containers:
        - name: frontend-container
          image: your-frontend-image
          ports:
            - containerPort: 80

# Backend Deployment
apiVersion: apps/v1
kind: Deployment
metadata:
  name: backend-deployment
spec:
  replicas: 3
  selector:
    matchLabels:
      tier: backend
  template:
    metadata:
      labels:
        tier: backend
    spec:
      containers:
        - name: backend-container
          image: your-backend-image
          ports:
            - containerPort: 8080

# Database Deployment
apiVersion: apps/v1
kind: Deployment
metadata:
  name: database-deployment
spec:
  replicas: 1
  selector:
    matchLabels:
      tier: database
  template:
    metadata:
      labels:
        tier: database
    spec:
      containers:
        - name: database-container
          image: your-database-image
          ports:
            - containerPort: 5432

# Frontend Service
apiVersion: v1
kind: Service
metadata:
  name: frontend-service
spec:
  selector:
    tier: frontend
  ports:
    - name: http
      protocol: TCP
      port: 80
      targetPort: 80

# Backend Service
apiVersion: v1
kind: Service
metadata:
  name: backend-service
spec:
  selector:
    tier: backend
  ports:
    - name: http
      protocol: TCP
      port: 80
      targetPort: 8080

# Database Service (ClusterIP for internal access)
apiVersion: v1
kind: Service
metadata:
  name: database-service
spec:
  selector:
    tier: database
  ports:
    - name: postgresql
      protocol: TCP
      port: 5432
      targetPort: 5432
In this manifest:
Deployments: There are three Deployments, one for each tier (frontend, backend, and database). Labels are applied to each pod's metadata, and the selector in each Deployment specifies the label to select pods belonging to that tier.
Services: There are three Services, one for each tier, that route traffic to the corresponding pods based on their labels. The labels used in Services' selectors match the labels applied to the pods.
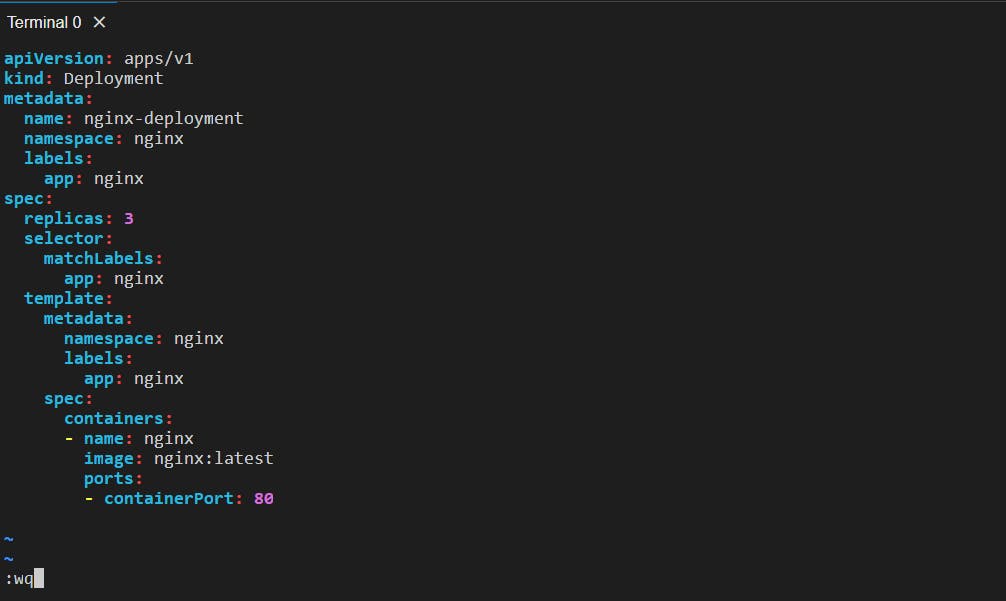
📍Deployment Manifest File for NGINX POD
apiVersion: apps/v1
kind: Deployment
metadata:
  name: nginx-deployment
  namespace: nginx
  labels:
    app: nginx
spec:
  replicas: 3 # 3 pods will be created
  selector: # Specifying the objects to use to identify pods
    matchLabels: # Specifying the labels that Deployment uses to select the pods it should manage
      app: nginx
  template: # Here we are defining the pods that this deployment will create and manage
    metadata:
      namespace: nginx
      labels:
        app: nginx
    spec:
      containers:
      - name: nginx
        image: nginx:latest
        ports:
        - containerPort: 80
Let's create a deployment.yml file and write the above Deployment manifest file into it.
Now, apply this configuration file using the kubectl apply -f deployment.yml command:

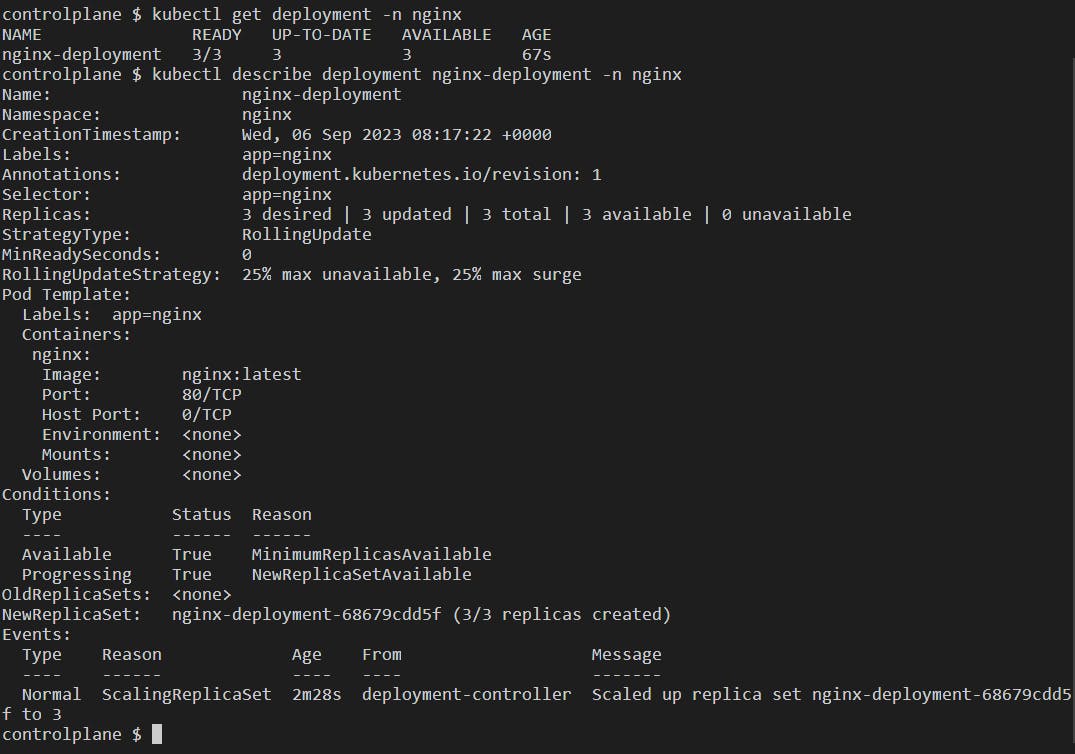
3 replicas of the NGINX pod have been created in the nginx namespace. kubectl get pods -n nginx:

You can also see only the deployment information using the command:
kubectl get deployment -n <namespace>: Gives information about the deployment running in the specified <namespace>.

kubectl describe deployment <deployment-name> -n <namespace>: Gives a detailed information about the deployment.
Let's pick any one pod created from the deployment file and try to access it:
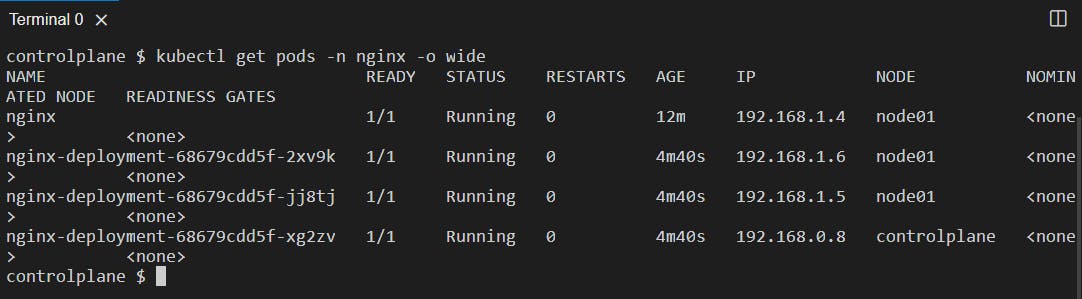
Let's access the pod with IP 192.168.1.6 at port 80 using the curl command:
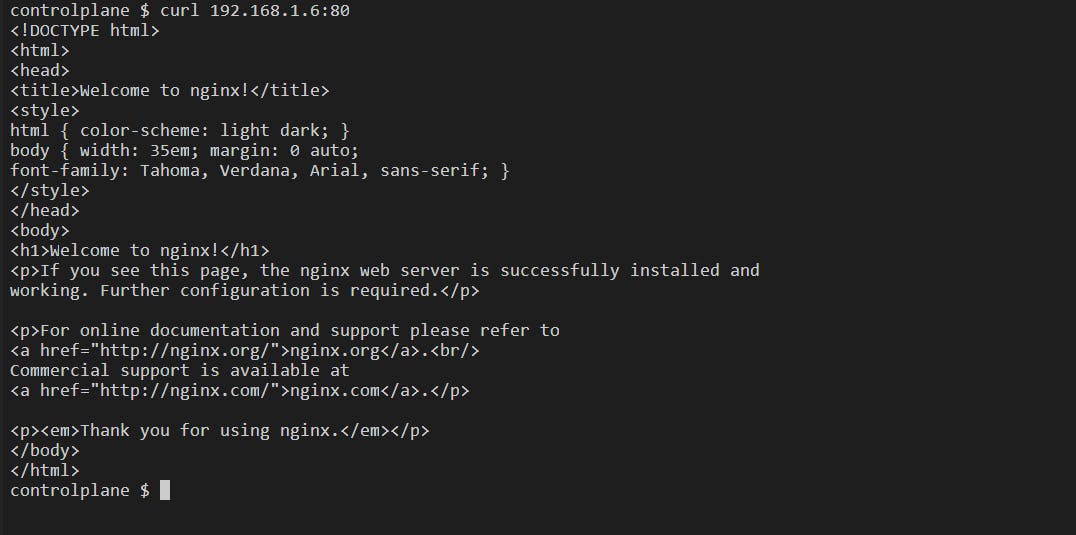
However, there is an issue with accessing the pod directly because the IP is dynamically assigned to the Pods and can change if the pod is rescheduled or restarted. Also if we access only a particular pod all the traffic will go to only that particular pod and there would be no load balancing which defeats the purpose of having multiple pods with some more issues. We need a resource to overcome this. To overcome all these, we have a resource called "Service". Let's explore this K8s resource "Service" in detail.
📍Service
In the deployment section, we started three NGINX pods, each set to use Port 80. Even though Port 80 is unique, Kubernetes gives us control over how many NGINX pods we want, whether it's 1, 200, or any number based on what we specify in the manifest file.
Collectively, the 3 pods we've created are known as a "deployment." This deployment entity, named "nginx-deployment" in our case, represents and manages these pods as a group. It gives us the flexibility to scale the number of pods up or down as needed. Each pod within the deployment is assigned a unique IP address to facilitate communication and distinguish between individual pods within the group.
However, it's important to note that the deployment itself doesn't provide external access to the NGINX pods. To establish external access, we must set up a connection, here comes the use of "Service".
Through a Service, outside users can access the NGINX pods. Kubernetes relies on the kube-proxy component to route external traffic to the pods on Port 80. To enable external access, we need to create a "Service" manifest file that acts as a bridge between outside users and the NGINX pods. This "Service" allows external users to reach the running application.
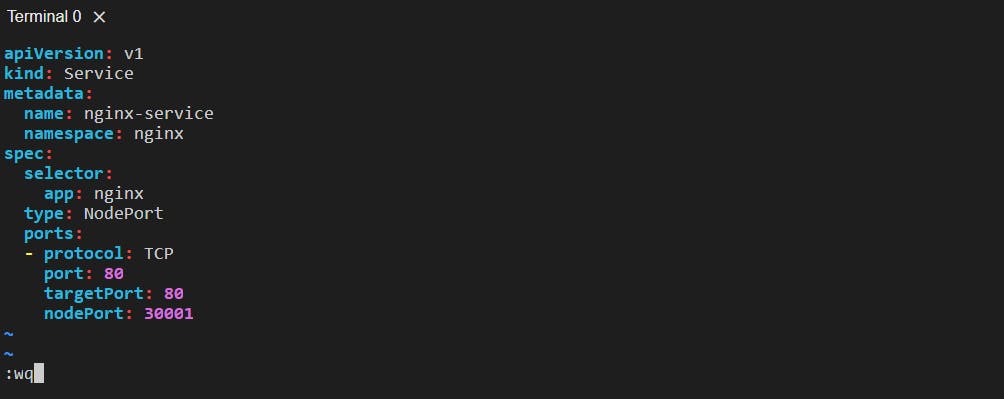
✔Service Manifest File for NGINX Deployment
apiVersion: v1
kind: Service
metadata:
  name: nginx-service
  namespace: nginx
spec:
  selector: # We are specifying what labels to select and give service to.
    app: nginx # Since, we wrote the same label in the deployment file.
  type: NodePort
  ports:
  - protocol: TCP
    port: 80
    targetPort: 80
    nodePort: 30001
Here's an explanation of each field in the Service manifest file:
spec: Specifies the desired state of the Service:
selector: Defines a set of labels used to select the pods that the Service should route traffic to. In this example, pods with the label
app: nginxwill be selected.type: Defines the type of Service. Common types include:
ClusterIP: The Service is accessible only from within the cluster.
NodePort: The Service is accessible from outside the cluster using a static port on each Node.
LoadBalancer: The Service is exposed using a cloud provider's load balancer.
ExternalName: Maps the Service to an external DNS name.
ports: Specifies the ports that the Service should listen on and where it should forward traffic to:
name: A name for the port (optional).
protocol: The protocol used (e.g.,
TCPorUDP).port: This is the port number exposed by the Service itself. It represents the port on which the Service listens for incoming traffic within the cluster. Some examples of where incoming traffic within the cluster occurs are Microservices Communication, Database Access, Load Balancing, Internal API Communication, etc.
targetPort: This is the port number on which the pods selected by the Service are listening. It tells the Service where to forward incoming traffic within the cluster. ( In our case, nginx-deployment port)
nodePort:
nodePortprovides a static entry point into your cluster for external traffic. Instead of needing to know which Node IP to connect to, external clients can target any Node's IP on the specifiednodePortand Kubernetes will take care of routing the traffic to the correct pods managed by the Service.
When type: NodePort is specified, Kubernetes assigns a port number from a range (default: 30000-32767) defined by the --service-node-port-range flag. This port is consistent across all nodes.
Each Node in the cluster acts as a proxy for the allocated port. This means that traffic received on that port on any Node will be forwarded to the Service.
The Service object's .spec.ports[*].nodePort field is subsequently updated with this allocated port number, making it accessible and consistent across the cluster.
Creating a service.yml file and writing the above manifest file in it:

Applying this service manifest file to the cluster:

Getting the service:
kubectl get service: It will give a list of services existing in the default namespace. There is a default kubernetes service to manage the K8s cluster and its resources.
kubectl get service -n <namespace> or kubectl get svc -n <namespace>: Lists the services existing in the specified namespace.

📍Assignment:
Set up a Kubeadm cluster on an AWS EC2 instance and practice this. You can refer to a step-by-step guide with this GitHub repository: https://github.com/LondheShubham153/kubestarter
While Practicing it on Kubeadm on an AWS instance you would have not been able to access the NGINX pod before creating this service.yml file. After creating it you will be able to access our NGINX pods which were created using deployment at the browser on the IP aws_ec2_public_ip:30001. Make sure to expose the port 30001 in the inbound rules, and security group of the AWS instance.
Make sure to Terminate the instance after you are done practicing as the 2 instances of type t2.medium might cost some.
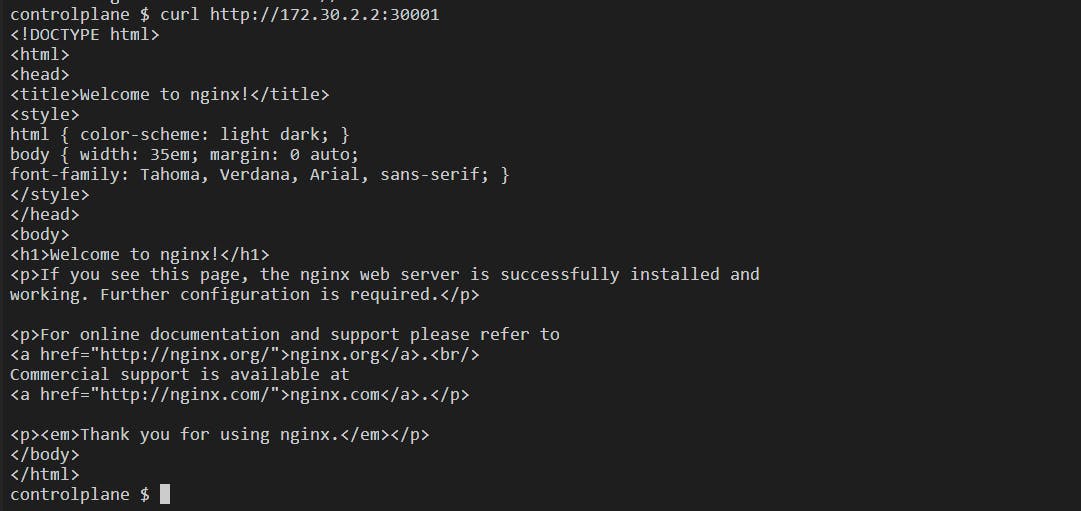
Let's try and access the pod at the nodePort 30001:
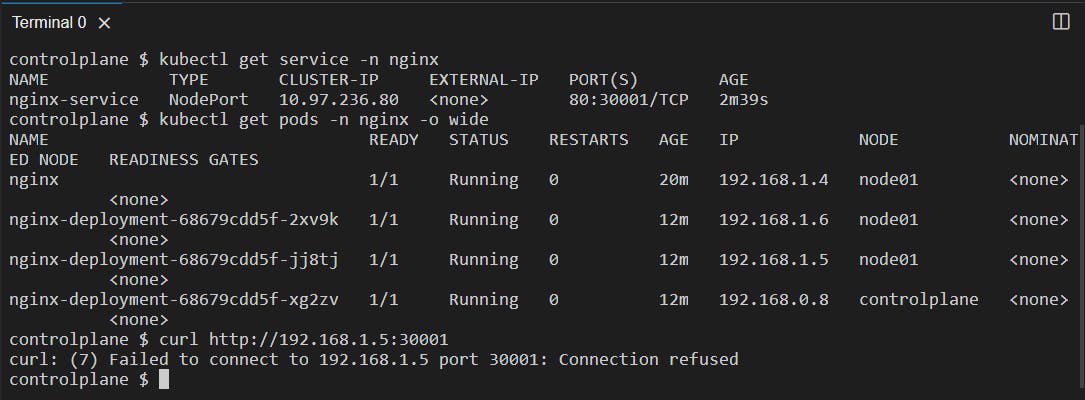
You can see we cannot access the pod with the pod IP we would have to access it using the node IP.
Getting node IP using the command kubectl get nodes -o wide:
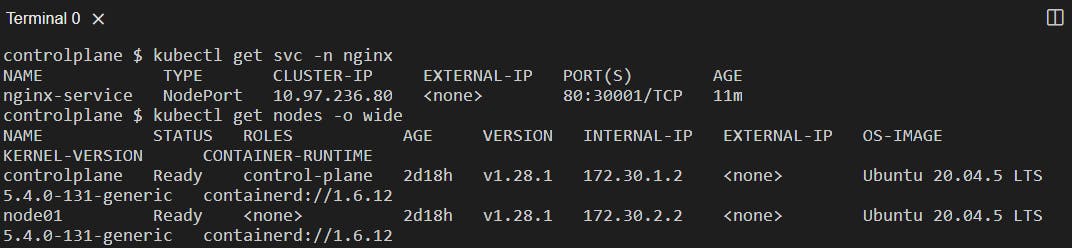
Access the pod using curl http://<nodeIP>:<nodePort>:
Now, let's see an example of auto-healing:
We can either kill the container using the docker kill <container_name/id> command or delete a pod using the command:
kubectl delete pod <pod_name> -n <namespace>: Deletes the pod <pod_name> that we got from the kubectl get pods -n <namespace> command from the specified namespace.
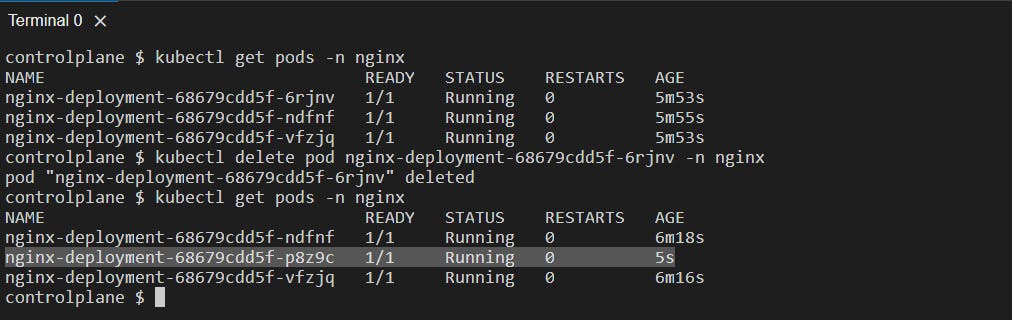
We can see that there is a new pod created since our desired state is 3 pods therefore, it maintains that desired state replicas of pods and creates a new pod. Therefore, our application running inside the deployment will never fail.
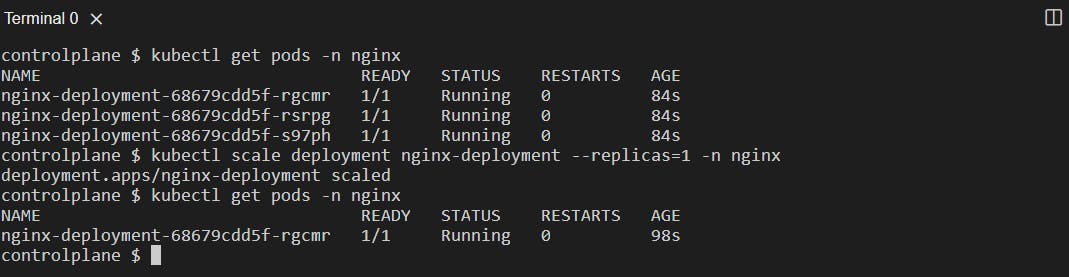
We can also scale the pods by defining the replicas in the command line.
kubectl scale deployment <deployment_name> --replicas=n -n <namespace>: Used to scale up or scale down based on what you specify in --replicas=n ( n can be any number )
Scale-down:
Scale-Up:
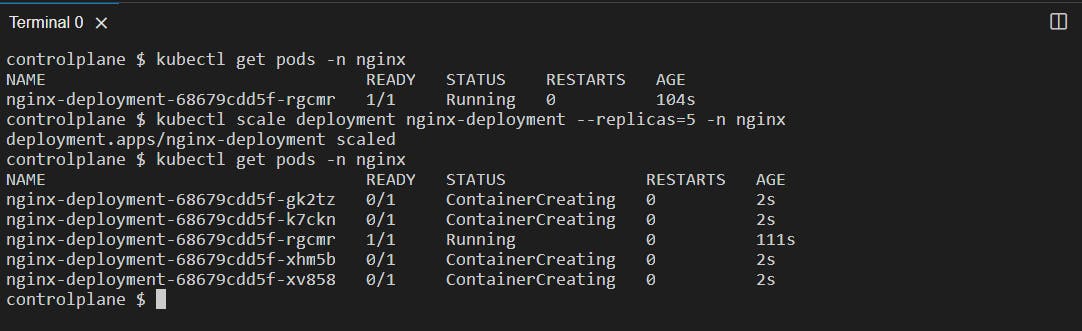
This command is useful for dynamically adjusting the capacity of your application by adding or removing replicas based on demand. It's a fundamental feature of Kubernetes for managing the availability and scalability of your workloads.
📝Note: The replica count specified using the kubectl scale command is a temporary adjustment and does not permanently modify the Deployment manifest file. Therefore, it is always recommended to modify the deployment file it is a best practice.
📍Conclusion
We have reached the end of this Kubernetes blog, try the assignment on Kubeadm to get more familiar with creating Manifest files.
Thank you for reading this blog! 📖 Hope you have gained some value. If you want to practice Kubernetes make sure you do it on Minikube or at killercoda.com where you get K8s playground for free.
If you enjoyed this blog and found it helpful, please give it a like 👍, share it with your friends, share your thoughts, and give me some valuable feedback.😇 Don't forget to follow me for more such blogs! 🌟